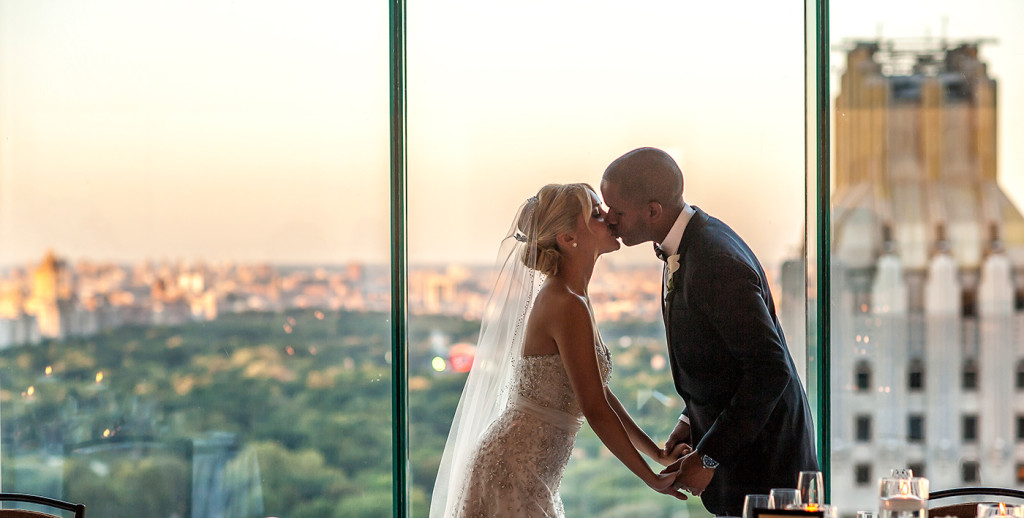
Take a look at the photo above – can you tell what it is?
Did you guess that it’s a happy couple on their wedding day? I’d bet that was a yes.
But how did you know? You can’t actually see the people, they’re all in shadow!
Well, yes, but there are the details that don’t involve the people – it’s the shape of their bodies and the way they meet in this kiss, one of their first as a married couple. It’s the slight hints of detail in the bride’s white dress that creep into the photo. It’s the venue – why else would someone be on a terrace overlooking New York’s Central Park while wearing wedding garb?
You don’t always need to show everything to make a photo – sometimes a silhouette will allow you to convey your story without hitting your viewer over the head.
And that’s where today’s post on shooting silhouettes starts.
Click to read more.
Tip #1: Find a scene with backlighting
I know, I know – in basic photo, you’re taught that backlighting is the worst. It’s where the light or brightest part of the scene is positioned behind your subject. But it’s precisely the kind of situation you want to be in to create a silhouette. A shot like the one featured at the top of the post is about embracing the bright scene behind the couple and letting them go to shadow while preserving the details of the area behind them.
If you can find something with an extreme difference in lighting between the foreground and background areas (with the background being brighter) than you can set something like this up. In this particular instance, a room with dim mood lighting for a wedding at Le Parker Meridien and Central Park outside the window, bathed in the glowing light of sunset.
Tip #2: Underexpose to get the silhouette
Most cameras won’t automatically go to the silhouette shot in the default metering mode that they are set to – usually something called “evaluative” or “matrix” metering. What a camera does is take in the entire scene and determine how to best expose to maintain as much of the highlights and shadows as possible (this is different from spot metering, where the camera will only look at one spot and ignore the rest of the scene to determine exposure).
By “averaging” out the scene in evaluative or matrix metering, you won’t get satisfactory detail in either the shadows or the highlights. This is where underexposing comes in – intentionally shooting below what your camera’s meter says is accurate exposure. By adjusting your settings (using a lower ISO or a faster shutter speed, for example) you can force the camera to create a darker exposure and this in turn will let your subjects drop to completely black outlines. If you choose the correct settings, the background will still be exposed properly.
It’s a good reason to practice shooting on manual exposure, though automatic modes such as aperture priority or shutter priority will allow you some amount of adjustment via exposure compensation (usually a +/- key somewhere on the camera, or the big wheel on the back of Canon cameras). This will adjust the automatic settings so that they veer towards undexposure (-) or overexposure (+).
Tips #3: Moments matter even more

With a silhouette, you don’t have detail information to create the content of the shot. You are more reliant on the shapes of your subjects working out than anything else, so take lots of shots, and direct your subjects on what works best, if that’s an option. How those shadows line up and interact will make or break the photo.
For reference, here’s the shot with the levels brought up in Photoshop, and another example of why a silhouette works well here – the bride and groom were carefully positioned so that there would be a gap between their faces, to be able to tell them apart. Without close direction to do that, most subjects get a little closer to smooch and this results in a silhouette that looks like a black blob.
The bride’s arms are also positioned in a way that looks a little out of place when you can see the details, but in silhouette form, that goes away so that you can focus on the moment that matters: The kiss.
So – don’t always go for what is supposed to be the “correct” exposure, but rather, the exposure that will convey the moment in the most meaningful way. In this case, that means a silhouette.


1 thought on “Three tips, better shot: Silhouette photos”